Viva (discontinued in 2022)
Viva Project Character Manual for v0.6 and above
THIS FEATURE WILL LAUNCH 9/28/19 BUT AVAILABLE NOW FOR SUPPORTER TIER https://www.patreon.com/sgthale
DOWNLOAD PRE-MADE CHARACTERS
If you don't know how to 3D model, you can download characters already made by people in the Discord's #character-cards. [Click to join]
INSTALLING CHARACTER CARDS
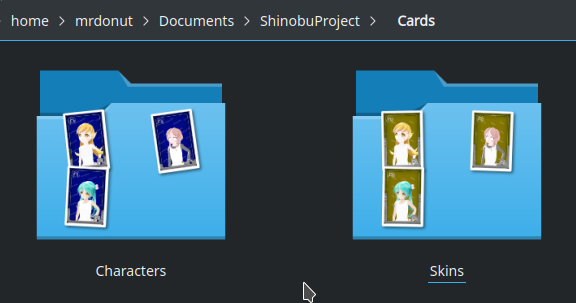
To install characters, download the blue character card and the yellow skin card and put them into your game's Cards/Characters and Cards/Skins folders. Make sure you download the full size image and not the thumbnails (from discord)! They can now be accessed in-game via the character customizer in the bedroom mirror:
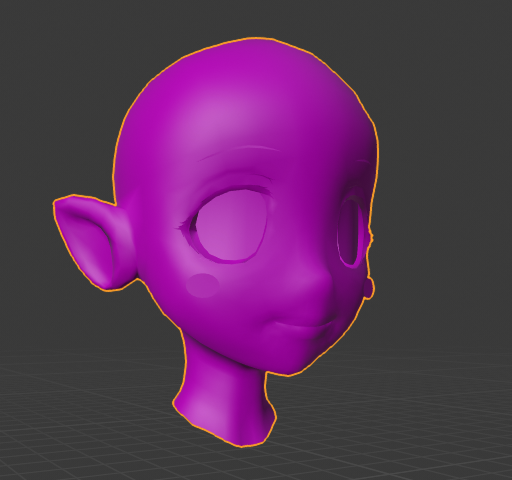
CREATING YOUR OWN CHARACTERS
Using the Blender Viva Model exporter addon, you can quickly port any 3d model and convert it into a .viva3d file format which contains everything about that model for runtime character customization. Your model cannot have more than 65536 triangles, 255 bones, 4 weights per vertex, and 3 materials (1 for skin and 2 for pupils). Getting your model working into the game can be done in an easy 5 minutes. Adding facial animations and eyes can take anywhere from 20 minutes to 2 hours. If you have issues exporting, check the log file for what errors you received and consult the HOW TO FIX section below. There is a starter kit in the game's Cards folder. Watch the tutorial below!
DEVELOPMENT DOWNLOADS
[Blender Viva Export Addon] <--REQUIRED
[Game Body] (for resizing your head to match the game's body
CREATE TAB EXPLANATION
After dragging and dropping your .viva3d into the game, you will be presented with a screen like this:
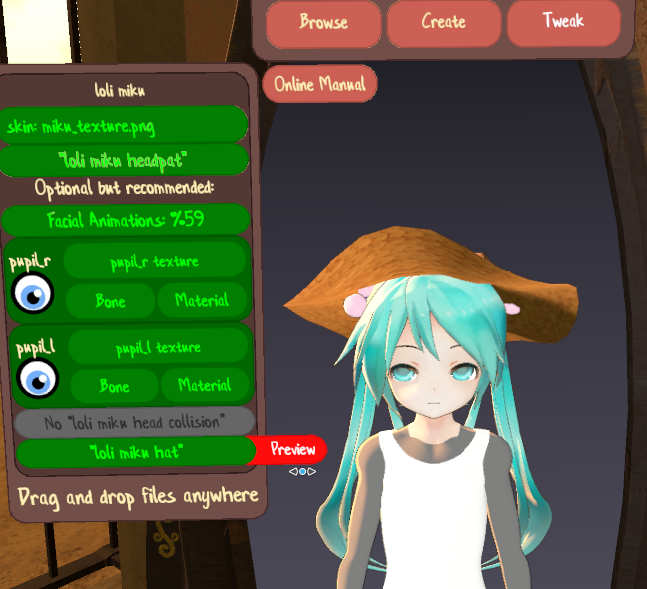
Going down:
| The title show as the name of your model |
| SKIN TEXTURE [REQUIRED]: Drag your texture into the game like the .viva3d file. It must be a 1024x1024 PNG. Transparency not supported. |
HEADPAT SPHERE [REQUIRED]: This will be used
to indicate where your hand will move around as it headpats your character.
Simply include any sort of sphere in the scene named "<CHARACTER>
headpat". Like so:
 |
| FACIAL ANIMATIONS [Recommended]: You are responsible for matching the game's shapekeys so your character is animated properly with the built-in animations. See the FACIAL ANIMATIONS section below for more info. |
| RIGHT PUPIL INFO [Recommended]: For eyes to work, both pupil infos must be complete (green). Must have a 512x512 PNG named "CHARACTER_pupil_r.png". See the EYES section below for more info. |
| LEFT PUPIL INFO [Recommended]: For eyes to work, both pupil infos must be complete (green). Must have a 512x512 PNG named "CHARACTER_pupil_l.png". See the EYES section below for more info. |
COLLISION HEAD SPHERE [Recommended]: This is used to indicate the sphere where your hair bones will collide with so they don't go inside the character's head. Simply include any sort of
sphere in the scene named "<CHARACTER> head collision". Like so: |
HAT INFO [Recommended]: This is so your character can properly wear hats from the game. Use the provided red hat to simply position it until it looks good on your character, and name it
"CHARACTER hat". That's it. You can preview it in the editor with the "preview button" in the create tab.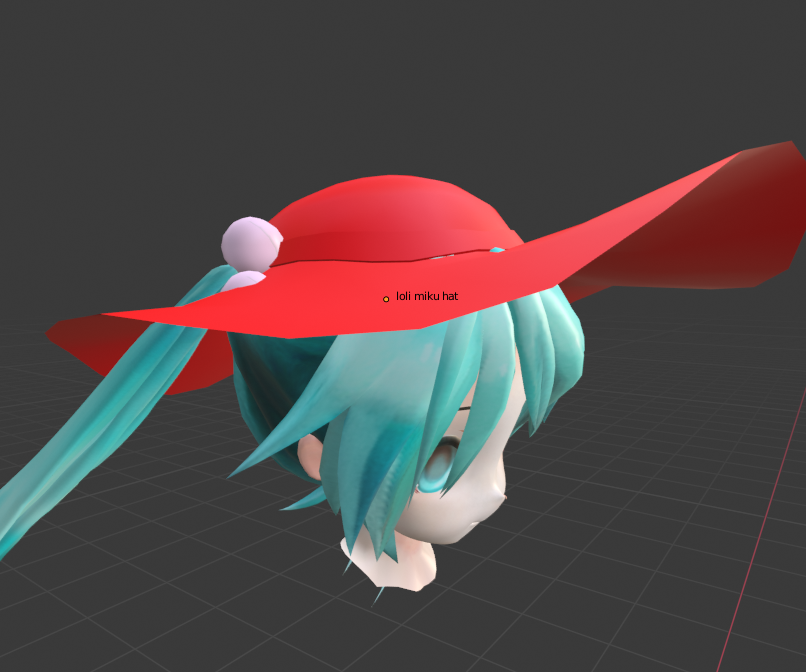 |
Completing the REQUIRED slots from above will grant you the Tweak tab.
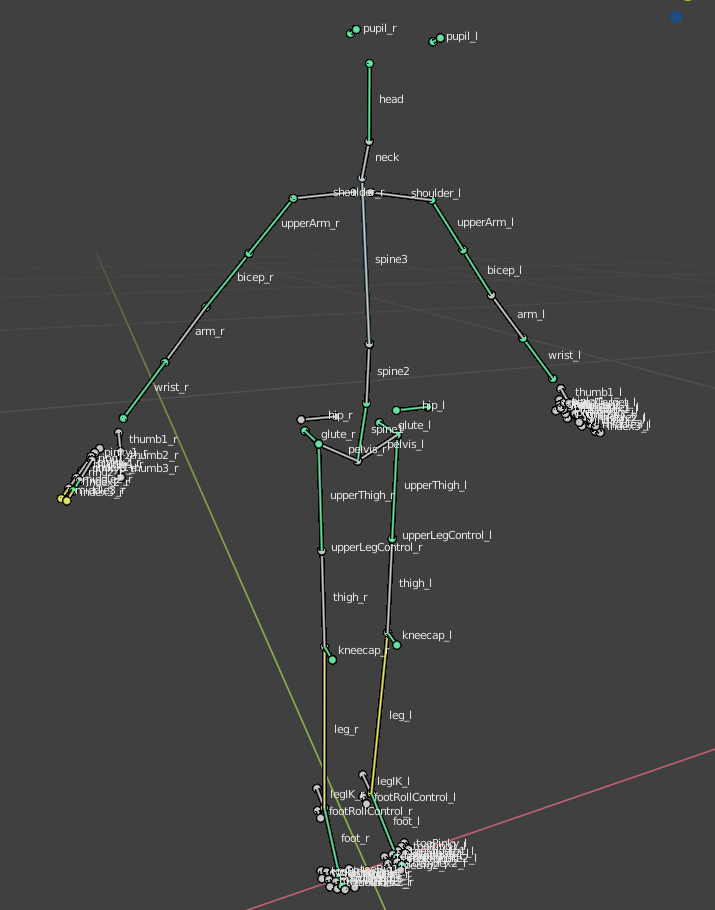
BONES
- By creating a bone in Blender and naming it to match any of the bones in the list below, the game will recognize the mesh weight painted for that bone as an attachment. Meaning you can attach any mesh to any part of the in-game skeleton. In the tutorial video I changed a bone and named it to "spine3". This made it so everything else that is attached to spine3 was recognized and included in the export (neck, head, hair bones, etc.). If you are unsure how things are meant to be parented, simply make your bones in any order, name them properly using the list below, and use the "Match Viva Model Skeleton" command in the Viva Model Exporter Blender addon. This will fix your bone parenting order and reposition to where they would be in-game. Bone list:
arm_l
arm_r
bicep_l
bicep_r
foot_end_l
foot_end_r
foot_l
foot_r
glute_l
glute_r
hand_l
hand_r
head
hip_l
hip_r
index1_l
index1_r
index2_l
index2_r
index3_l
index3_r
kneecap_l
kneecap_r
leg_l
leg_r
middle1_l
middle1_r
middle2_l
middle2_r
middle3_l
middle3_r
neck
pinky1_l
pinky1_r
pinky2_l
pinky2_r
pinky3_l
pinky3_r
ring1_l
ring1_r
ring2_l
ring2_r
ring3_l
ring3_r
shoulder_l
shoulder_r
spine1
spine2
spine3
thigh_l
thigh_r
thumb1_l
thumb1_r
thumb2_l
thumb2_r
thumb3_l
thumb3_r
toeBig1_l
toeBig1_r
toeBig2_l
toeBig2_r
toeIndex1_l
toeIndex1_r
toeIndex2_l
toeIndex2_r
toeMiddle1_l
toeMiddle1_r
toeMiddle2_l
toeMiddle2_r
toePinky_l
toePinky_r
toeRing1_l
toeRing1_r
toeRing2_l
toeRing2_r
upperArm_l
upperArm_r
upperThigh_l
upperThigh_r
wrist_l
wrist_r
EYES
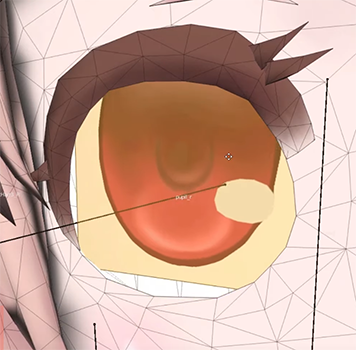
Viva project eyes need 3 things to work for each eye; a bone, a material, and a texture. Both eyes must be fully set to work.
Bone: Must be named pupil_r or pupil_l and be positioned where the eye looks out from. It must be parented to the head bone.
Material: Create a flat plane card where the eye socket is and UV unwrap it so a flat texture can be placed in the middle. Make sure both eyes have the same UV direction or your character might be cross-eyed!
Texture: Pupil textures must end with _pupil_r or _pupil_l so the game knows which one is which. They must be 512x512 PNG (no alpha) when you drag and drop them.
FACIAL ANIMATIONS
To easily include facial animations with your custom character model, simply rename existing shape keys to any of the in-game shape key list below and export. To see what each shape key should look like, refer to the shinobu_v4.blend file (download link above). Some shape keys have a left and right side (e.g. smile_r and smile_l). To save time, you can simply make a shape key named "smile" and the export script will automatically split it up into the 2 variants for you. The following items in bold are considered highly recommended to have:
centerLip
cheek_l
cheek_r
frown_l
frown_r
happyClosedEyelids
jawDown
lipsShut
lowerEyelid_l
lowerEyelid_r
lowerLip_l
lowerLip_r
madEye_l
madEye_r
madEyebrow_l
madEyebrow_r
platysma
puckerLips
sadEyebrow_l
sadEyebrow_r
showBotTeeth
smile_l
smile_r
upperEyelid_l
upperEyelid_r
upperLip_l
upperLip_r
HOW TO FIX
If you received a "Failed" when you tried to export your model, a log will appear with the issues that your model has. This is what you can do to fix them:
Problem: [BONES] Bone X is stray! It must have a parent.
Solution: You cannot export a model with stray bones that aren't attached to any in-game bones. Your model must be an attachment for the character. Create a bone and set it's name to any from the skeleton bones list above.
Problem: [BONES] Bone X is set to no deform. All exported bones must be set to deform. Remove this chain or mark as deform.
Solution: Check "deform" in the bone's settings to make sure it deforms. All exported bones for your character must deform you cannot have helper bones.
Problem: [BONES] Base skeleton bone X must have no parent or be parented to Y,
[BONES] Base skeleton bone X must be parented to Y
Solution: The hierarchy of the in-game character skeleton is not allowed to be changed. Any custom bones you make cannot be the parent of a built-in game bone. Match the parenting order or run "Match Viva Project Skeleton" command.
Problem: [ARMATURE] Multiple Armature modifiers found. Mesh cannot have more than 1 armature modifier.
Solution: You might have more than 1 armature modifier on your object. Delete the extra ones.
Problem: [BONES] Too many bones. Must have less than 256
Solution: You have too many bones but if you get anywhere near this number, it's probably best as bone physics are performance heavy.
Problem: [VERTICES] Exceeded max vertices! Mesh must have less than 65535
[SUBMESH] X has too many triangles! Submesh must have less than 65535 triangles
Solution: Try cutting down on the number of vertices/faces before exporting.
Problem: [MATERIALS] Model has zero materials!
Solution: Your model must have at least 1 material to be exported properly.
Problem: [UV] Model must have 1 active UV map. Add one.
Solution: Make sure your object has a UV map, check if there are any in the UV Maps dropdown menu.
Problem: [FACES] Mesh must be triangulated. Found face with X vertices. All faces must have 3 vertices.
Solution: Your model must be made of triangles only. If you select your entire mesh and press Ctrl+T, it will turn it into triangles. Beware and make sure your shape keys are not messed up when you do this! Always check them right afterwards.
Comments
Log in with itch.io to leave a comment.
I've tried to add pre made characters by dragging and dropping them in but it doesn't work.
me too but it just doesnt work
the discord link is invalid
it isinint working for my pc and im trying to dounload the needed thing but it dont work
dose it work in pc version of v0.75.3.